Dawn's Inspirations

Craft with Me #4 – Making Embellishment – 1

On this “Craft with Me” we are going to look at making out own embellishments but this time with a Paper Clip Base.

These embellishments can then be adding to your Scrapbook Pages, Folios, Albums and Cards making good all those bits and pieces we hang on to -just in case!

Filed Under: Free Tutorials, Off the Page Projects

Men’s Shirt Gift Bag & Card

Here is a great project when gift giving the men in your life, it works well for so many male occasions – Father’s Day-Birthday’s-Wedding Gifts- etc

The smaller one is made from just one sheet of A3 card and then the larger one is made from 2 sheets of A3 card. I have also made a matching Card in 2 different styles from an 8″ x 8″( 20cm x 40cm Card)

So what the videos and Craft -along with Me.


Filed Under: Free Tutorials, Off the Page Projects

Flip Style Mini Album – Book 2

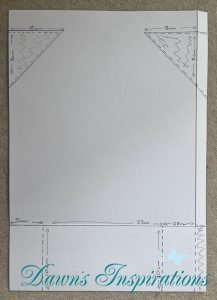
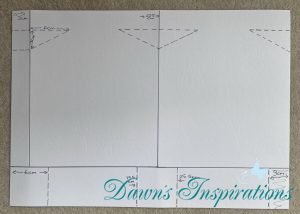
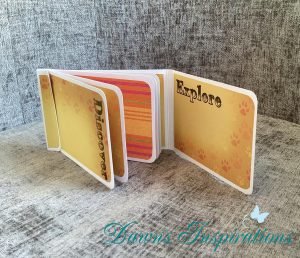
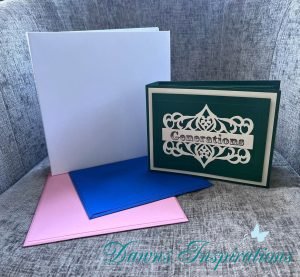
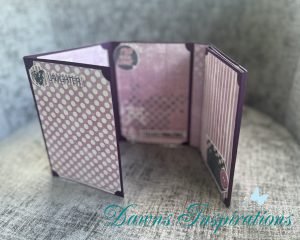
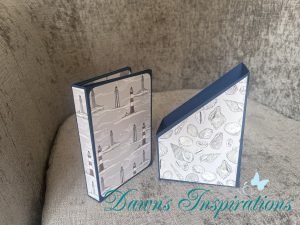
Here is the second Book in my Flip Style Mini Album and the 2 together look great in the Slip File Cover. Perfect to gift or keep for yourself.
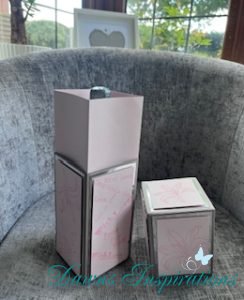
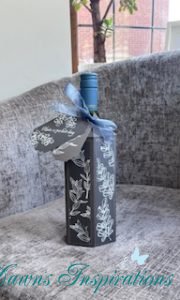
Flip Style Mini Album Book 2

Flip Style Mini Album – Book 2; holds 10 photos
You will need 5 sheets of A4 card stock and patterned paper and
embellishments to decorate.

  • Cut 1 sheet of card stock to measure 10 1/4” x 6 1/2″. Then score on long
    side at 4 5/8”  in on each end.
  • Cut 4 sheets of card stock at 9″ x 6 1/2″ and then score on long side at 4
    1/2″.
  • Cut a strip of 3/4″ x 6 1/2″ to reinforce the spine.
  • Cut 12 Patterned Papers as portrait pattern 4 1/4″ x 6 1/4″
  • cut 2 Patterned Papers 7/8″ x 6 1/4″

Now you can watch the video to see how to put the album together.

File Storage for Flip Style Mini Album
You will need 2 sheets of A4 card and patterned papers and embellishments to decorate.

  • Cut 2 at 8 ¾” x 8 ¼”
  • Score both on the short side at 2 ¼” 6 ¾”
  • Score both on the long side at 6 ½”
  • Patterned Papers cut 1 at 2″ x 2 3/4″
  • Patterned Papers cut at 2″ x 6 1/4″
  • Patterned Papers cut 2 at 4 1/4″ x 6 1/4″
  • Now you can watch the video to see how to put it together.


Filed Under: Free Tutorials

Flip Style Mini Album – Book 1

This is a quick super cute Mini Album Book you can make in no time at all with very few supplies.


Flip Style Mini Album -Book 1


Flip Style Mini Album – Book 1; holds 10/12 4 x 6 photos

You will need 3 sheets of A4 card stock and patterned papers and embellishments to decorate.

  • Cut 2 sheets of the cardstock to measure 10 1/4″ x 6 1/2″. Then score these on the long side at 4 1/2″ – 4 3/4″- 9 1/4″ – 9 1/2″.
  • Cut 1 sheet of cardstock to measure 10″ x 6 1/2″. Then score on the long side at 4 1/2″ and 5 1/2″.
  • Cut a strip 3/4″ x 6 1/2″ to reinforce the spine.
  • Cut 12 Patterned Papers as portrait pattern 4 1/4″ x 6 1/4″
  • cut 2 Patterned Papers 7/8″ x 6 1/4″

Now you can watch the video to see how to put the album together.

File Storage for Flip Style Mini Album

You will need 2 sheets of A4 card and patterned papers and embellishments to decorate.

  • Cut 2 at 8 ¾” x 8 ¼”
  • Score both on the short side at 2 ¼” 6 ¾”
  • Score both on the long side at 6 ½”
  • Patterned Papers cut 1 at 2″ x 2 3/4″
  • Patterned Papers cut at 2″ x 6 1/4″
  • Patterned Papers cut 2 at 4 1/4″ x 6 1/4″

Now you can watch the video to see how to put it together.

Filed Under: Free Tutorials

Wine Box & Wine Bottle Cover

In this weeks Pink Frog Facebook Live, I created a Wine Box and also Wine Bottle Cover using the Pink Frog A3 Card. 

Follow the FB Live Video to see how to make these and I have also put all the measurements I used here too.


Wine Bottle Cover

  • A3 Card score on long side at 5cm 10cm 15cm 20cm 25cm 30cm and cut at 34cm. (2″ 4″ 6″ 8″ 10″ 12″ cut at 12 1/2″)
  • On short side score at 5cm in on both ends. (2″ in on both ends)

Decorative Panels

  • Base mats – cut six at 4.5cm x 19cm (1 3/4″ x 7 1/2″)
  • Top mats – cut six at 4cm x 18cm (1 1/2″ x 7 1/4″)


Wine Box

  • Bottom Box use A3 card and score on long side at 10cm 20cm 30cm 40cm (4″ 8″ 12″ 16″) using the Box Base score lines on your score board.
  • Then score on the short side at 10cm (4″) using the Box Base score lines on your score board.
  • Box Lid use A3 card and score on long side at 10cm 20cm 30cm 40cm (4″ 8″ 12″ 16″) using the Box Base score lines on your score board.
  • Then score on the short side at 10cm (4″) using the Box Base score lines on your score board. You can then trim down box lid to fit the height of your wine bottle.
  • Box insert – use A3 card and score on the long side at 10cm 20cm 30cm 40cm (4″ 8″ 12″ 16″) using the Box lid score lines on your score board.

Decorative Panels

  • Base layer Box Base – cut four at 9cm x 19cm (3 1/2″ x 7 1/4″)
  • Top layer Box Base – cut four at 8cm x 18cm (3 1/4″ x 7″)
  • Base layer Box Lid – cut four at 9cm x 12cm (3 1/2″ x 4 1/2″)
  • Top layer Box Lid – cut four at 8cm x 11cm (3 1/4″ x 4 1/4″)
  • Lid Topper – cut one at 9cm x 9cm (3 1/2″ x 3 1/2″) and one at 8cm x 8cm ( 3 1/4″ x 3 1/4″)

Filed Under: Free Tutorials, Off the Page Projects

FREE Wallet Style Mini Brag Book Tutorial

I first created this project over 12 years ago and was the first project I filmed for my Dawn’s Inspirations YouTube Channel and you can still see my original one here Wallet Style Mini Brag Book.

I felt is was time to refresh this free video tutorial as it is still a popular project, plus modern technology and video cameras have come long way and many of my YouTube Subscribers still enjoy this super cute project.

You will need;

Supplies

  • 2 x Sheets of 12″ x 12″ card stock
  • Decorative Papers I have use 8 sheets of 8″ x 8″
  • 2 x Magnets or Ribbon as a closure.

Tools

  • Paper Trimmer
  • Inches Scoreboard
  • Wet Glue
  • Scissors
  • Bone Folder
  • Corner Rounder

Instructions;

  • Use one sheet of 12″ x 12″ scoring at 2 1/4″ 2 1/2″ 9 1/2″ & 9 3/4″.
  • Do a quarter turn and score at 3 3/4″ 4″ 8″ 8 1/4″
  • Then cut away the 4 corners as I show you on the video.
  • Cut the other sheet at 12″ x 12″ to create Two strips of 12″ x 4″
  • Scoring the two strips of 12″ x 4″ on the long side at 6.
  • Then from what is left cut a piece at 7″ x 4″and score on the short side at 1/2″.
  • Watching the Step by Step Video Tutorial, you will see how to put these together.
  • Don’t forget to attach your magnets or Ribbon before add your Patterned Papers.

Patterned Papers to Decorate;

Outside of Wallet

  • 2 at 6 3/4″ x 3 1/2″
  • 1 at 6 3/4″ x 3 3/4″
  • 4 at 5 3/4″ x 3 3/4″

Inside of the Wallet

  • 2 at 6 3/4″ x 3 1/2″
  • 1 at 6 3/4″ x 3 3/4″
  • 2 at 6 3/4″ x 3 1/4″
  • 2 at 5 3/4″ x 3 3/4″
  • 2 at 2″ x 3 3/4″
  • 2 at 4″ x 3 3/4″

Now you are ready to gift your super cute Wallet Style Mini Brag Book or keep it yourself to fill with photos and memories.

Wallet Style Mini Brag Book


Filed Under: Free Tutorials

YouTube-Craft with Me – Wallet Style Mini Brag Book

This is my first YouTube-“Craft with Me” and I thought it was only fitting to make with you the first project I created and filmed for  YouTube some 12years ago.

Wallet Style Mini Brag Book

So print off the PDF and gather your supplies and join me for an hour of being creative, making this super cute project


Filed Under: Free Tutorials

Multi 12 x 12 Scrapbook Layout Project

I had a few 12×12 Double and Single Scrapbook Layouts of the same trip and wanted to put them in one place so came up with this little project. I didn’t want to use a an Album or a Folio this time so came up with this idea and would love to know what you think?

Filed Under: Free Tutorials, Off the Page Projects

Black Ice Techniques x3

In todays Pink Frog Facebook Live I share 3 different techniques using the Black Ice idea. so take a look and have a go as it is fun.

All products I have used can be found here https://www.pinkfrogcraftsandcards.co.uk/dawn-macfie-craft-along-140525-4pm-446-c.asp


Filed Under: Cards, Free Tutorials

Mini Wallet

This really quick Mini Album can be made in no time at all with very few supplies, plus you can use scraps of patterned paper to decorate it.

This Mini Wallet was made using 10.5 cm x 30cm (4” x 12”)card blanks from Pink Frog (you will need 4 cards)

Construction 

  • Cover – score long side @ 10.5cm 11cm 21.5cm & 22cm (4 1/8” 43/8” 8 1/2” & 8 3/4”)
  • Pages –  take 2 cut to 10.5cm x 26cm (4 1/8″ x 10 1/4″) and score on long side @ 10.5cm & 21cm (4 1/8” & 8 1/4”)
  • Photo mats – cut 2 @ 8cm x 8cm (3 3/4” x 3 3/4”)

Decoration

  • Outside cover-cut 2 @ 9.5cm x 9.5 cm (3 3/4” x 3 3/4”) And also cut 1 @ 9.5cm x 7cm ( 3 3/4” x 2 3/4”)
  • Inside –Cut 1 @  9.5cm x 7cm ( 3 3/4” x 2 3/4”)
  • Cut 2 @ 9.5cm x 9.5 cm ( 3 3/4” x 3 3/4”)
  • Cut 2 @ 9.5cm x 6cm ( 3 3/4” x 2 1/4”)
  • Cut 2@ 9.5cm x 4cm ( 3 3/4” x 1 3/4”)
  • Cut 4 @ 8cm x 8cm (3 1/4” x 31/4”)

Filed Under: Free Tutorials

Matchbook Mini Album

Here is a Super quick Matchbook Mini Album made using Pink Frog 10.5cm x 30cm Card blanks.

Here are the measurement’s for a Matchbook Mini using 10.5cm x 30cm ( 4” x 12” ) cards ( you will need 4 and a bit card blanks)

Construction

  • Cover- Take 1 and score long side 15.5cm 16cm ( 6” & 6 1/4”)
  • End piece – Cut 5cm x 10.5 cm ( 2 1/4″ x 4″) score long side 2.5cm & 3cm (1″ & 1 1/4″ )
  • Pages – Take 3 and score long side 13.5cm 15cm & 16.5cm  (5 3/8″ 5 7/8” & 6 3/8″)

Decoration

  • Back Cover -cut 2 @ 9.5cm x 14.5 cm ( 3 3/4” x 5 3/4”)
  • Front Cover cut 2 @ 9.5cm x 13cm (3 3/4” x 5 1/4” )
  • Hinge –  cut 2 @ 9.5cm x 2cm ( 3 3/4” x 3/4”)
  • Pages – cut 12 @ 9.5cm x 12:5cm ( 3 3/4 x 5”)


Filed Under: Free Tutorials

Add Hard Covers to your Albums

Ever wanted to add hard covers to your Pink Frog Memory Books. Well join me Wednesday 2nd April 2025 at 4pm BST for a Facebook Live to show you not ONE but TWO super quick easy ways to do this.

I have also added the additional PDFs to my Online Workshops for;

The 8×8 Memory Books  the Large Landscape/Portrait Memory Books and the Medium Landscape Portrait Memory Books

I have also created a PDF Cutting & Scoring Guide for all the Pink Frog Memory Books so you now can create your own.

  1. The Wrapped version is perfect when staring a new book.
  2. The Back To Back is perfect for Books you have already created.

So print off your PDF and lets get crafting!

Hard Cover Combinations

Filed Under: Free Tutorials

  • 1
  • 2
  • 3
  • …
  • 12
  • Next Page »
  • My Account

Newsletter


I give my consent to Dawns Inspirations to be in touch with me via email using the information I have provided in this form for the purpose of news, updates and marketing.


  • Shop
  • Account

Copyright © 2025 · Dawns Inspirations

Copyright © 2025 · Dawns Inspirations on Genesis Framework · WordPress · Log in