Dawn's Inspirations

Star Mini Book Tutorial

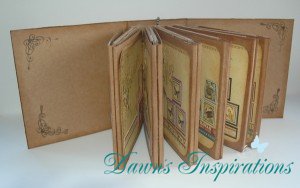
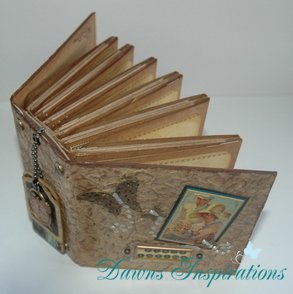
This Star Mini Book makes a great Mothering Sunday Gift. A star to give the person who is a “star in your life!”

Star Mini Book

You can make it as personal as you like too, with sayings, drawnings from the children and photographs too.
Star Mini Book

An idea size to keep in a a handbag as a brag book to share and once open can be displayed to share too.

Star Mini Book

Star Mini Book

However, this little mini Book does not have to only be for Mother’s Day as it can fit many different occassions, Christmas, Birthdays, Weddings, Just beacuse!, Teacher gifts to name but a few.

So go ahead sort out your crafty stash and make this quick and simply mini.

Star Mini Book

Supplies you will need to make this quick and easy projects are,
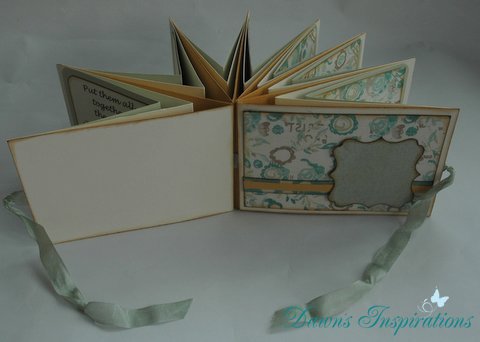
7 pieces of cardstock 4” x 12”
7 pieces of cardstock 4” x 10”
7 pieces of cardstock 4” x 8”
2 pieces of cardstock 4” x 6”
Photo mats cut 7 or 14 (your choice on how you are decoration the book) 3 ¾ “x 3 ¾” out of patterned paper.
24″ ribbon.

If you would like to use the Mother Verse to add to your album the PDF is here:

pdficon_large

pdficon_large

Filed Under: Free Tutorials

Graphic45 Place in Time Mini Birthday Book TUTORIAL

My Graphic45 Place in Time Mini Birthday Book Tutorial is now live.

Using a Graphic45 Place in Time 6×6 paper pad that came free with issue 118 of Simply Cards and Papercrafts along with some kraft cards I have made this beautiful Mini Birthday Book.

Please note, this video is in a playlist and the next one automatically follows at the end

Here are some images of my page layouts using the papers to there full potential. To see a bigger picture please click on each image.

january
february


march
april


may
june


july
august


september
october


november
december


If you cannot get 8×8 kraft cards you can still craft along with me using some 12×12 kraft cardstock to make your pages. The last video in this playlist is a tutorial on how to do this.

There are the measurements to go with this video.

Cut a strip 4” x 12” then cut a piece of the 12” side so your card now measures 4” x 11 ¼”.

Get this ¾” piece and cut it in half on the short side, then score both these pieces in half again and burnish the fold and set aside.

Now get the 4”x 11 ¼” piece and score on the long side at 3 ½” and 7 ½”.

Then make an extra score line at 1/8”to the left of the 7 ½” score line.

You will need to cut 12 photo/tags for your pockets and these measure 3 ¼” x 3 ¾ ”.

You can now follow the rest of the video tutorials to make up your Place in Time Birthday Book.

Filed Under: Free Tutorials

Graphic45 Place in Time Mini Birthday Book

Well one rainy Sunday I headed of to my craftroom with a project in mind to use a Freebie paper pad I got from Simply Crads & Papercraft Magazine.
DSC_0044


I had this for a few weeks and I knew I wanted to make a mini book but was not sure how to get the most from it. It contain 12 double sided pages however, one side of the paper was the foundation page and the other was the cut a parts to go with that month. But I wanted to use both and I didn’t want to go and buy a second magazine, so this is what I came up with.

DSC_0056 (3)

I have filmed a video tutorial so you too can craft along with me and make this great little project.

I will let you know as soon as it is “live” so please subscribe to my website, YouTube Channel or Facebook Page and you will be one of the first to know so you too can make your own Place in Time Mini Birthday Book.
DSC_0054-001
DSC_0051 (3)-001


Filed Under: Free Tutorials

Style 4 File Folder Mini Scrapbook Album

Here is Style 4 in my File Folder Mini Series. With my step by step video tutorial you can craft along with me to make this beautiful mini album.

Again all I have used is an office foolscap file folder, a sheet of 12×12 kraft card stock and some patterned papers, so with the use of a very few materials you to can make a quick and easy mini album to house lots of 6×4 photos and memorabilia.

So go on dust off your file folders and make a mini scrapbook album!


Filed Under: Free Tutorials

Add On Interactive Pages for the 6×6 Mini Scrapbook in an Hour

With the success of the 6×6 Mini Scrapbook in an Hour  I want to show you how you can create this album with some interactive pages which means you can add even more photos to your mini scrapbook album.

This is a step by step tutorial in real time, so you can gather up your supplies and craft along with me.

I have broken this tutorial down into several videos so it makes it easier for you to stop and pick it up at again at anytime, meaning you don’t need to fast forward the video and find where you left off.

Each page construction and dectoration has its own video, there are 4 interactive pages along with inside front and back cover pocket pages.

I have also broken the assembley of the Album in 2 parts, part 1 shows how to attach the pages to the spine as it is slightly different to the method used in the 6×6 Mini Album in and Hour. In part 2 we attch the pages to the cover and finish decoration the Album.

This tutorial is great for crafters of any ablities and as the video tutorials are step by step which makes it easy to follow, I would recommend this to take your mini scrapbooks to another level. Enjoy!

Interactive Page style 1

Interactive Page Style 2

Interactive Page Style 3

Interactive Page Style 4

Inside Cover Pocket Pages for your 6×6 Scrapbook Album

Assembly Part 1

Assembly Part 2

Do you prefer the Video Tutorials broken down in to stages?
Do you find it easier to stop and pick up where you left off?
Is this easier than following a video tutorial for over an hour plus?
I would love to know your thoughts so I can improve my way of showcasing my tutorials, please leave me your comments. Happy Craftying Dawn x

Filed Under: Free Tutorials

Card & Envelope Scrapbook Projects

I picked up a pack of note cards and envelopes whist out shopping and it was such a bargain at 99p and thought what could I make with these!!!
Well I was so pleased as out of one pack of 10 note cards and envelopes along with a little extra card stock and ribbon I managed to make 4 very different projects.
The cards I have used measure 3 & 7/8″ x 5″ and the envelopes are 4″ x 5 1/2″. If you are using note cards and envelopes of a difference size then you will need to adjust your measurements.

Project 1 – A Magic Wallet

Project 2 – Jacobs Ladder Scrapbook

If you would like to make your own template for the presentation box to hold your Jacobs Ladder Scrapbook please click here

please do bear in mind if your cards and envelopes are of a difference size then you will need to adjust your measurements.

Project 3 – Envelope Wallet Mini Album

 
Project 4-Envelope Mini Album

So when you out shopping next grab a packet of note cards and envelpoes and craft along we me to make these 4 different projects from very few materials.

Filed Under: Free Tutorials

Folded Pocket Page Album Tutorial STYLE2

This is another great tutorial that shows you another version of a Folded Pocket Page Mini Album.

In this tutorial I will show you 2 different page styles that each have their own tags and large photo mats. I also show you have to add the stack the deck hinge system to your cover and how to add your pages to this hinge system.

If you make this 4 page album you will be able to showcase over 24 photos plus 6 extra tags to add smaller photos or journalling. A great project for an afternoons crafting.


Folded Pocket Page Album Tutorial Part 1


Folded Pocket Page Album Tutorial Part 2

To make a 4 page album you will need 7 sheets of 12×12 patterned paper, plus 4 sheets of 12×12 matching card stock.

Page 1 Lay your 12×12 patterned paper on a score board and score at 6″, then do a quarter turn and score at 3″ and 6″.

Cut 3 photo mats from your card stock measuring 5 1/2″ x 5 1/2″

Page 2 Lay your patterned paper on your score board and score at 6″, then do a quarter turn and score at 3″ and 6″, then do a quarter turn again and score at 5″ and 7″ but only to the 6″ mark.

Cut 2 tags from your card stock measuring 2 1/2″ x 5 1/4″

and 2 photo mats measuring 5 1/4″ x 5 1/4″.

Stack the Deck Hinge

From Card stock cut the following

1 piece measuring 3″ x 6″ and score at 1/2″ and 2 1/2″

1 piece measuring 2 1/2″ x 6″ and score at 1/2″ and 2″

1 piece measuring 1 1/2″ x 6″ and score at 1/2″ and 1″

Now you can follow the video tutorials to learn how to make this beautiful mini album.

I do hope you enjoy this album tutorial and I would love to know what you think of it, so please leave a comment.

Filed Under: Free Tutorials

How to add Hinges to your Board Cover Mini Albums

Here is a quick tutorial to show you 2 different types of hinges you can add to your board mini album covers.
My version of Kathy Orta’s Hidden Hinge and laura Denison Stack the Deck system.

Filed Under: Free Tutorials, Tips and Techniques

“Scrap in a Box” Mini Scrapbook Album

This video tutorial shows you step by step how to make this lovely “Scrap in a Box” Mini Scrapbook Album.
The album can be made in two different ways too and I will show you how to make them both.
This quick project it makes the perfect gift for that special occasion and using just one sheet of 12×12 card stock, some patterned paper and a length of ribbon.

So go one give it a go and make your own “Scrap in a Box”.

Filed Under: Free Tutorials, Off the Page Projects

Toilet Roll Mini Scrapbook Album Tutorial with a Hinge System

Try out this unique and individual idea to add a touch of class to your toilet roll mini scrapbook album.

So start up-cycling your toilet rolls and give them a new lease of life.

Filed Under: Free Tutorials

Style 3-File Folder Mini Album Tutorial

Here is Style 3 in my File Folder Mini Album Tutorial Series.
Using just 1 File Folder, 1 sheet of 12×12 Kraft Card Stock and a Freebie paper collection from a craft magazine, you to can create this beauitful mini album.

Basic Measurements for this album are;
Open up your file folder and on the shortside score at 1 1/2″ 6 3/4″ & 12″.
On the longside score at 8 1/2″ & 9″.
Cut 4 photo mats from the Kraft card stock measuring 6 1/2″ x 5″. (If you what the video you can see how to get 4 photo mats from one sheet of 12×12 card)
Now you can watch the video and craft along with me to make this beautiful mini album.
I do hope you enjoy it?

Filed Under: Free Tutorials

DIY board covers for you mini scrapbook albums

To make a board cover for you scrapbook mini albums can take sometime and some skills if you are a new crafter. However, in this video tutorial I show you a quick way to get the same affect in minimal time and at very low cost.

With the use of an empty cereal box or similar and some 12×12 patterned papers, you can now make your own board covers for your mini scrapbook albums.

Filed Under: Free Tutorials

  • « Previous Page
  • 1
  • …
  • 8
  • 9
  • 10
  • 11
  • 12
  • Next Page »
  • My Account

Newsletter


I give my consent to Dawns Inspirations to be in touch with me via email using the information I have provided in this form for the purpose of news, updates and marketing.


  • Shop
  • Account

Copyright © 2025 · Dawns Inspirations

Copyright © 2025 · Dawns Inspirations on Genesis Framework · WordPress · Log in