Dawn's Inspirations

  • Shop
  • Account

New Page Style for your 6×6 & 8×8 Memory Books from Pink Frog

If you are loving your 8×8 and 6×6 Memory Books using the Memory Book Kits from Pink Frog, why not try out this New Page Style to give your Memory Books a totally different look and the great thing is you can do with without buying any extra cardstock to go with these fabulous Memory Book Kits from Pink Frog.

I have also given you all the measurements in Inches and Centimetres so you choose which you like to work in.

8×8 Memory Book 


PLUS the Step by Step Videos for both sizes of Memory Books.

Centimetres 8×8 Memory Book 

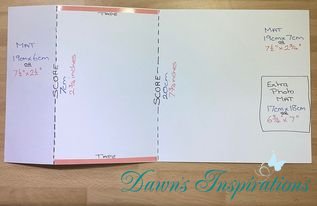
Inches 8×8 Memory Book 

6×6 Memory Book


PLUS the Step by Step Videos for both sizes of Memory Books.

Centimetres 6×6 Memory Book

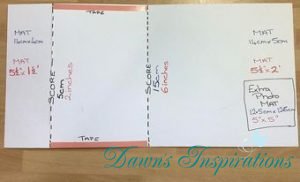
Inches 6×6 Memory Book 

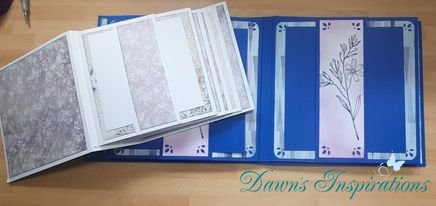
Memory Book Kits are available here https://www.pinkfrogcraftsandcards.co.uk/pink-frog-crafts-memory-book-kits-314-c.asp and come in 8×8 and 6×6 Size.

With each Kit you can make 4 Memory Books and they come will full instructions and Cutting/Scoring Guide.

If you prefer a Step by Step Video to go with your Kits this is also available here https://dawnsinspirations.com/shop/8-8-memory-book/

Filed Under: Free Tutorials, Tips and Techniques

How to make a quick Concertina Mini Album


This super quick project is perfect when you fancy an couple of hours crafting making a project from start to finish. I used the 15cm x 42cm Card stock from Pink Frog.

This gives a nice size for adding 6″ x 4″ photos in so a good size Mini Album. Making them perfect for give giving as they holding 14 photos.

So gather your supplies and let make this super cute Concertina Mini Album.

Cover

  • Cut one card at 41cm x 15cm (16 1/2″ x 5 7/8″) and score in at 20cm (8 1/2″) at both ends on the long side.

Pages

  • Cut one at 20cm x 15cm (8 1/4″ x 5 7/8″) and score at 18cm (7″) on the long side.
  • Cut 5 at 20cm x 15cm ( 8 1/4″ x 5 7/8″) and score on at 2cm (3/4″) on long side at both ends.

Decorative Mats Outside Cover

  • Cut 2 at 19cm x 14cm (7 3/4″ x 5 1/2″)
  • Cut 1 at .75cm x 14cm (3/8″ x 5 1/2″

Decorative Mats Inside Cover

  • Cut 1 at 19cm x 14cm ( 7 3/4″ x 5 1/2″)
  • Cut 2 at 17cm x 14cm ( 6 3/4″ x 5 1/2″)
  • Cut 1 at 1.5cm x 14cm (5/8″ x 5 1/2″)

Decorative Mats Page Mats 

  • Cut 11 at 1.5cm x 14cm (5/8″ x 5 1/2″)
  • Cut 11 at 15cm x 14cm ( 6″ x 5 1/2″)

I love seeing what you make so please feel free to share over on my Facebook Page.

Filed Under: Free Tutorials

3 How To Make Presentation Boxes Ideas

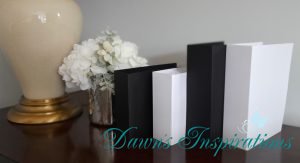
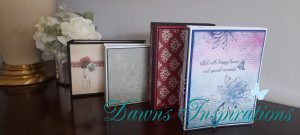
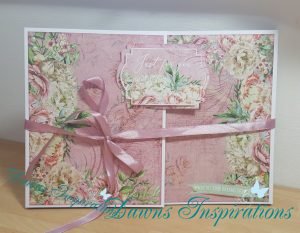
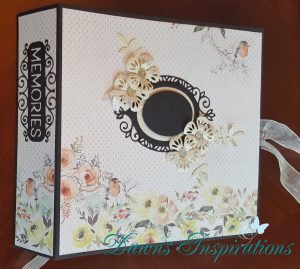
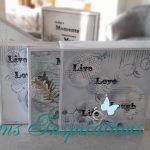
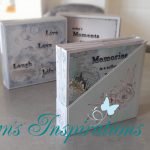
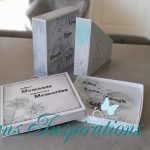
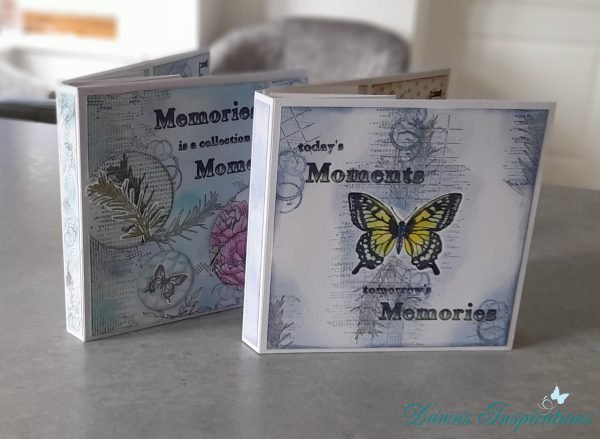
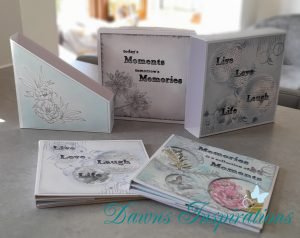
Here are 3 different ideas to use as Presentation Boxes or Storage for your Foto Folios & Size 8 Memory Folios .

The Slip Cover, The File Box and the Presentation Box are fabulous ways of taking your Foto Folio & Memory Folios to another level.

Not only I filmed you a Step by Step Video Tutorials but I have also created PDFs in both Inches and Centimetre Versions for you to print off and keep.

Metric Cutting & Scoring Guide

Imperial Cutting & Scoring Guide

I do hope you enjoy these super quick How To projects?


Slip Cover

File Box 

Presentations Gift Box

Filed Under: Free Tutorials, Workshop Tutorials

Size 8 Memory Folio


Here is my Size 8 Memory Folio and some ideas of how you can decorate your own. These are a great size if the thought of a 12×12 Memory Folio feels a bit big for you to start with.

Kits are available from Pink Frog Crafts https://www.pinkfrogcraftsandcards.co.uk/size-8-memory-folio-kit—watercolour-8633-p.asp

My Online Workshop for this Size 8 Memory Folio is available here https://dawnsinspirations.com/shop/size-8-memory-folio/

The Memories & Moments Word Stamps you can buy here https://www.pinkfrogcraftsandcards.co.uk/memories–moments-a5-clear-stamp-set-8582-p.asp

Filed Under: Free Tutorials

BONUS Double Pocket Page for Landscape Memory Book

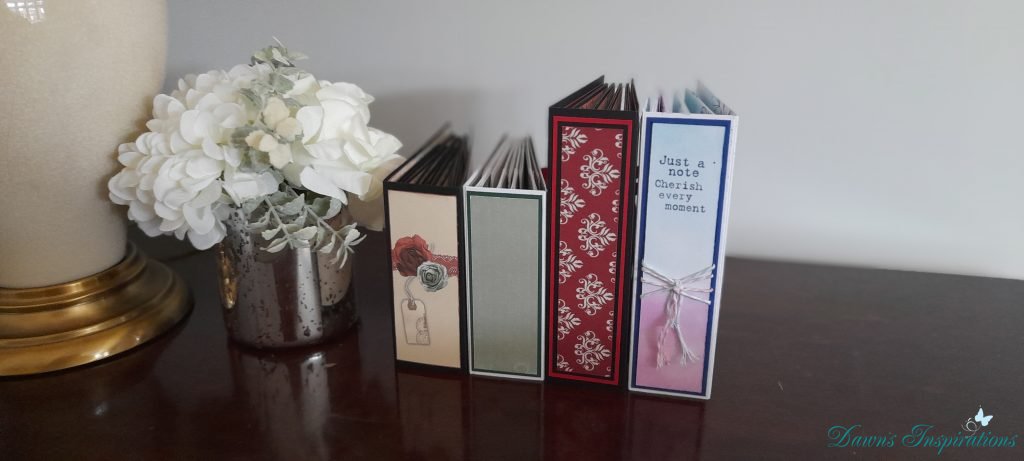
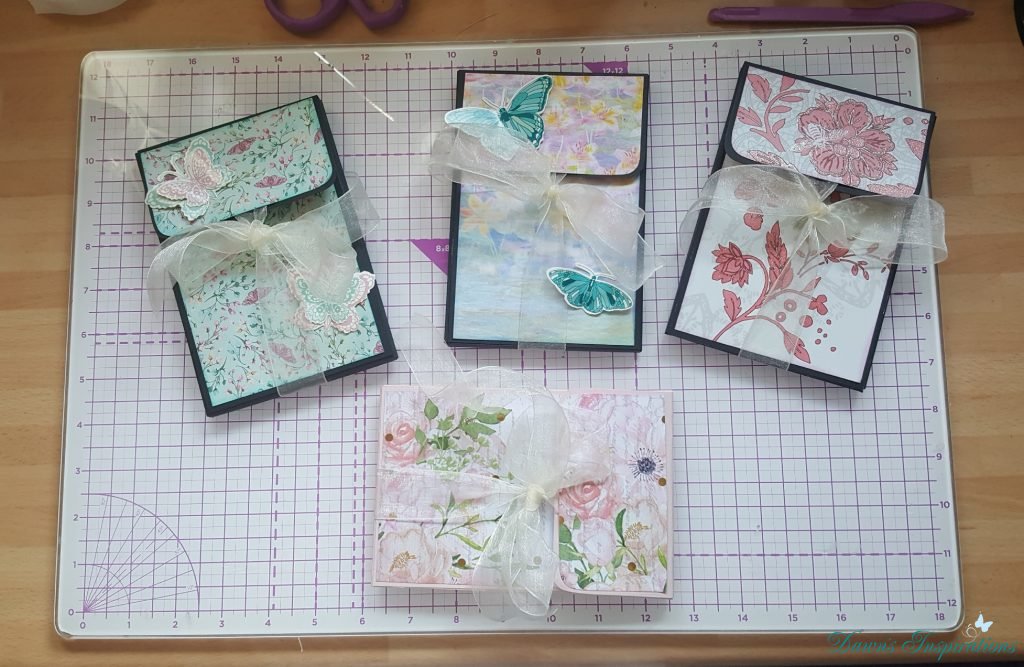
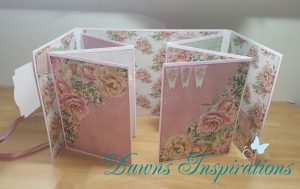
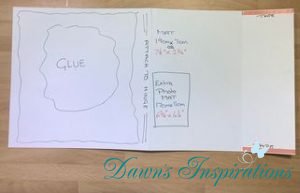
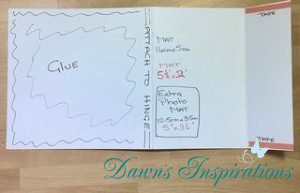
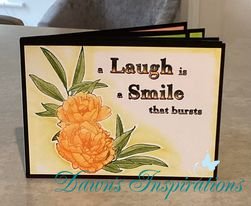
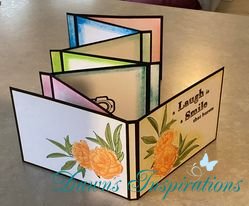
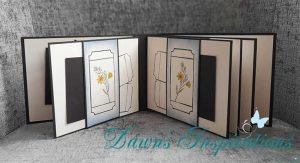
Here is a new page fold you can choose to add to your Large Landscape Portrait Memory Books. You could also create new Landscape Memory Books by using the same cover and hinge measurements but by adding this new page for a totally new look.


You will see below I have filmed a Step-by-Step Instructional Video for you to follow. For convenience, I have filmed 2 videos, one in metric for those who like to use centimetres, and the other in imperial for those of us who choose to use inches.

I first shared this idea on the Craft Show on 22nd November 2021.
If you would like to do the tutorials, click here and I will take you Step-by-Step through putting it together

Metric – centimetre version

Imperial – inches version

Filed Under: Free Tutorials

Landscape/Portrait Memory Book

This Landscape/Portrait Memory Book Bundle from Pink Frog is Great! It comes in Medium and Large sizes too!

They make your Main Memory Books and then you can use your creativity to decorate them as you wish so they can be used for many occasions or to store memorabilia in

How to make the Landscape Version of your Memory Books

How to make the Portrait Version of the Memory Books.

You will find everything I have used here;
Large Landscape/ Portrait Memory Book Bundle here https://bit.ly/3qI3sRR
Medium landscape/portrait memory Book Bundle https://bit.ly/3wb8A1Y
Red Liner Tape https://bit.ly/3jqcr8z
EVA Glue https://bit.ly/3du7Yhw
Anti Clogging – Fine Nozzle Glue Bottles https://bit.ly/3hmFzLk
Teflon Bone Folder https://bit.ly/3hhDpgc

So you can make your Own Memory Books and use your own creativity to turn them to this.

Filed Under: Free Tutorials

8×8 Gatefold Trifold Mini Album


This gorgeous 8×8 Gatefold Trifold Mini Album is the perfect Keep Sake Mini Album.
This has been made as a sample for the up and coming Pink Frog One Day Special Shows over on Hochanda TV Friday 12th March 2021 until Saturday 13th March 2021.
I have used the Pink frog 20cm x 40cm Super Smooth Cardstock and the Brand New Spring Flowers and Typewriter Sentiments Stamps.

The Album itself is really quick to make so gather your supplies and lets make this super quick Mini Album.

The measurements are,

Cut one sheet of card at 20cm so you have 2 pieces of 20cm x 20cm.
Score another piece of card at 9cm & 10cm on either end and burnish the score lines.
Now stick the 2 square of card to the flaps on each end of the piece you have just scored, this is your cover.
Take the next 3 sheets of card and score each one at each end in 10cm and burnish the score lines.
Watch the video if you wish to add the shaped pockets to your project.
Once you have cut shapes (optional) you can stick the 2 end flaps of the centre card to the out side ones.
now stick the middle large panel to the cover you have created.
Attach your ribbon fastening and you are ready to decorate.

Decorating your Album with Patterned Papers.

Patterned Paper sizes.
Large panels are 19cm x 19cm
Small panels are 9cm x 19cm
to cut shaped pockets see my video as I show you 2 different techniques to do this.

Filed Under: Free Tutorials

2020 Retreat Project -Dawn’s Inspirations

Just thought I would share with you the Project the crafters made at my 2020 Weekend Scrapbook Retreat.

Filed Under: Bespoke Designs, Free Tutorials, Off the Page Projects

Pocket Size Brag Wallet

This Cute Pocket Brag Wallet is so quick to make and makes a great gift to post on to someone you care about while we are in the Covid19 Lock down. What better way to cheer someone up if they received this through the post.

This can be made with UK A4 or US Letter Size Card. 

You will need;

3 x sheets of A4 Cardstock

2 x sheets of 12 x 12 Patterned Paper or Any patterned paper you have

2 x Ribbon approx 12″ long

Instructions;

Take one sheet of A4 card and score 2 1/2″ 2 3/4″ 9″ & 9 1/4″ on the Longside.

Do a quarter turn and Score at 1 3/4″ 2″ 6 1/4″ & 6 1/2″ on the short side.

Cut away the corner squares – See the video for this

Burnish all your Score lines. and Corner rounder the top small flap.

With another piece of A4 cut out 3 x 4 1/8″ x 6 1/4″ and attach these to the other 3 sides of the main project. – See the video for this

With the last piece of A4 cut so you have 2 pieces of 5 3/4″ x 8 1/4″ and then score both of these on the long side at 4″ and 8″. –See the video for how to attach these.

Patterned Paper Sizes;

8 @ 4″ x 6″

2 @ 4″ x 2 1/4″

8 @ 3 3/4″ x 5 3/8″

For the waterfall long;

Cut 3 @ 4″ x 5 3/4″ Score 1/4″

Pattered Papers cut 6 @ 3 3/4″x 5 3/8″

Book Style;

Cut 3 @ 4″ x 5 7/8″ score 1/4″

Pattered Papers cut 6 @ 3 3/8″ x 5 6/8″


Filed Under: Free Tutorials

Mini Brag Wallet in a Box

This Mini Brag Wallet in a Box makes a great keepsake gift to give or just perfect for putting all photos into from one event.

Presentation Box

Box Base cut a square 7 ¾” x 7 ¾” and score in ¾” on all four 4 sides.

Box Lid cut a square 7 7/8” x 7 7/8” and score in ¾”  on all four sides

Papers for lid cut one at 6”x 6” and cut 4 at 6” x ¾”

Paper for the Bottom Base 6” x 6”

Brag Wallet

Main Back – Take 12”x 12” Score on at 2 ½” and 3” on all four sides

Top Flap – Cut 6”x 4 ½” and stick to the top.

Bottom Flap – Cut 6”x 6” and stick to the bottom.

Right Side – Cut 11” x 6” and score at 6” and stick to right hand side.

Left Sided – Cut 12” x 6” and score at 6” and 10” and don’t stick it down yet. Cut 2 photo mats one at 5” x 5” and the other at 3 ¼” x 5”.

Main Back – Cut 4 pieces at 5 ½” x 4” and score ½” on one long side on each one to create a waterfall element to the back page.

Patterned Papers

Back – Cut 1 at 5 ¾”x 5 ¾”

Top Flap – Cut 2 at 5 ¾” x 4 ¼”

Bottom Flap – Cut 2 at 5 ¾” x 5 ¾”

Middle –Cut 1 at 5 ¾” x 5 ¾”

Waterfall – Cut 8 at 5 ¼” x 3 ¼”

Right Side – Cut 2 at 5 ¾” x 5 ¾” and Cut 2 at 4 ¾” x 5 ¾”

Left Side – Cut 1 at 5 ¾” x 5 ¾” for the back of the left side page.

 Plus cut another at 5 ¾” then trim it to 2 ¼” for the front inside pocket. The remainder goes on inside pocket and glue to make a pocket.

Cut 1 at 3 ¾” x 5 ¾” for the inside flap.

Cut 1 at 5 ¾ x 4 ¼”” and then trim to 1 ¾” stick to the front pocket. Then stick the 2 ½” and stick to inside pocket.

Cut 2 at 4 ¾” x 4 ¾” to cover one photo mat.

Cut 2 at 3” x 4 ¾” to cover the other photo mat.

Cut out an envelope and make a little Photo/Journal book to go into your envelope.

Cut 2 slip pockets and 2 tags to go inside the pockets.

Filed Under: Free Tutorials

Super Quick Flip Flap Gatefold Mini Album


In this Video Tutorial you to can make your own Super Quick Flip Flap Gatefold Album is made using some card stock and envelopes.

Construction Measurements

Cut one card stock at 11 3/4″ x 7 3/4″ and on the long side score in 3/8″ on both ends.

Cut two card stock at 6 3/4″ x 7 3/4″ and on the short side score one end at 3/8″.

Then glue the spines together to create your album cover. Also at this stage don’t forget to attach your ribbon.

Join three 5×7 envelopes together to make a concertina. and then repeat this with another envelopes.

Now stick these to the back of your album cover – see the video to help you.

Papers for Outside Cover

Cut one at 10 3/4″ x 7 1/2″

Cut two at 5 3/4″ x 7 1/2″

Papers for Inside Cover

Cut one at 10 1/2″ x 7 1/2″

Cut two at 5 3/4″ x 7 1/2″

Papers for Pages

Cut 12 at 5″ x 7″

Then add your own decoration as you wish.

Filed Under: Free Tutorials

Making a Large Album using the Precious Memories Dies.

In this Step by Step Video Tutorial I show you how to make a Larger 8×8 Mini Album using the Crafters Companion Precious Memories Hinge Die. Giving you even more possibilities with your Collection.


Here are the basic measurements you will need to create this album. If you watch my Step by Step Video you will then see how to put it all together ready for you to decorate however you wish.

Cover

Cut 2 A4 Card to 8 ¼” 10 ½” and score in 2” in on 1 long side on both pieces.

Hinge

Die cut 2 hinges from the collection and then attach double sided tape to both hinges and then score each one as to stick them.

Cut Card 8” x 3 ½” and score in at ¾” on both sides at the short end.

Cut Double Adhesive sheet to 8” x 1 7/8” and stick to the centre of this card. Then cut 2 more strips of ¾” x 8” and stick to the wings.

Pages

Cut 6 pages from Card 8” x8”.

Stick double sided adhesive to one end and corner round the other 2 corners.

Papers

Outside Cover – Cut 2 at 8 ¼” x 8” and 1 at 1 7/8” x 8”

Inside Cover – Cut 2 at 8 ¼” x 8”

Pages – Cut 12 at 7 ¾” x 7 ¾”

Extra Half Flaps

Cut 4 card at 5 ¾” x 4” and Cut 4 papers at 5 ½” x 3 ¾”

Cards for inside Flaps

Cut 4 cards at 5 ¾” x 3 ¼”

Cut 4 papers at 5 ½” x 3”

Cut 4 white papers 5 ½” x 3”

Photo Mats

From white paper Cut 16 at 5 ¾” x 3 ¾” and punch decorative corners if you wish.

Filed Under: Free Tutorials, Workshop Tutorials

  • « Previous Page
  • 1
  • …
  • 3
  • 4
  • 5
  • 6
  • 7
  • …
  • 12
  • Next Page »
  • My Account

Newsletter


I give my consent to Dawns Inspirations to be in touch with me via email using the information I have provided in this form for the purpose of news, updates and marketing.


Copyright © 2025 · Dawns Inspirations ·