Dawn's Inspirations

Craft with Me #4 – Making Embellishment – 1

On this “Craft with Me” we are going to look at making out own embellishments but this time with a Paper Clip Base.

These embellishments can then be adding to your Scrapbook Pages, Folios, Albums and Cards making good all those bits and pieces we hang on to -just in case!
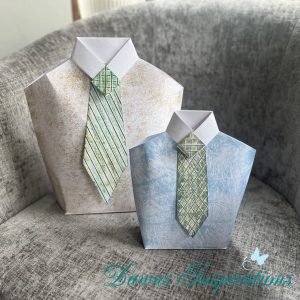
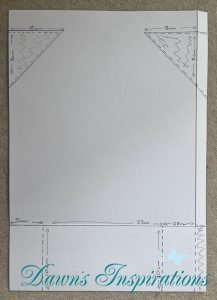
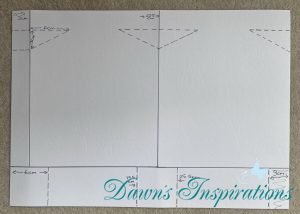
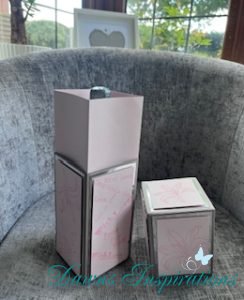
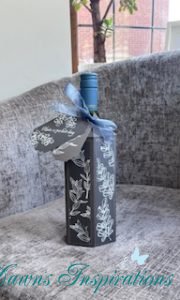
Filed Under: Free Tutorials, Off the Page Projects

Men’s Shirt Gift Bag & Card

Here is a great project when gift giving the men in your life, it works well for so many male occasions – Father’s Day-Birthday’s-Wedding Gifts- etc

The smaller one is made from just one sheet of A3 card and then the larger one is made from 2 sheets of A3 card. I have also made a matching Card in 2 different styles from an 8″ x 8″( 20cm x 40cm Card)

So what the videos and Craft -along with Me.


Filed Under: Free Tutorials, Off the Page Projects

Wine Box & Wine Bottle Cover

In this weeks Pink Frog Facebook Live, I created a Wine Box and also Wine Bottle Cover using the Pink Frog A3 Card. 

Follow the FB Live Video to see how to make these and I have also put all the measurements I used here too.


Wine Bottle Cover

  • A3 Card score on long side at 5cm 10cm 15cm 20cm 25cm 30cm and cut at 34cm. (2″ 4″ 6″ 8″ 10″ 12″ cut at 12 1/2″)
  • On short side score at 5cm in on both ends. (2″ in on both ends)

Decorative Panels

  • Base mats – cut six at 4.5cm x 19cm (1 3/4″ x 7 1/2″)
  • Top mats – cut six at 4cm x 18cm (1 1/2″ x 7 1/4″)


Wine Box

  • Bottom Box use A3 card and score on long side at 10cm 20cm 30cm 40cm (4″ 8″ 12″ 16″) using the Box Base score lines on your score board.
  • Then score on the short side at 10cm (4″) using the Box Base score lines on your score board.
  • Box Lid use A3 card and score on long side at 10cm 20cm 30cm 40cm (4″ 8″ 12″ 16″) using the Box Base score lines on your score board.
  • Then score on the short side at 10cm (4″) using the Box Base score lines on your score board. You can then trim down box lid to fit the height of your wine bottle.
  • Box insert – use A3 card and score on the long side at 10cm 20cm 30cm 40cm (4″ 8″ 12″ 16″) using the Box lid score lines on your score board.

Decorative Panels

  • Base layer Box Base – cut four at 9cm x 19cm (3 1/2″ x 7 1/4″)
  • Top layer Box Base – cut four at 8cm x 18cm (3 1/4″ x 7″)
  • Base layer Box Lid – cut four at 9cm x 12cm (3 1/2″ x 4 1/2″)
  • Top layer Box Lid – cut four at 8cm x 11cm (3 1/4″ x 4 1/4″)
  • Lid Topper – cut one at 9cm x 9cm (3 1/2″ x 3 1/2″) and one at 8cm x 8cm ( 3 1/4″ x 3 1/4″)

Filed Under: Free Tutorials, Off the Page Projects

Multi 12 x 12 Scrapbook Layout Project

I had a few 12×12 Double and Single Scrapbook Layouts of the same trip and wanted to put them in one place so came up with this little project. I didn’t want to use a an Album or a Folio this time so came up with this idea and would love to know what you think?

Filed Under: Free Tutorials, Off the Page Projects

Dawn’s Fill Your Own Advent Calendar Online Workshop Taster

Its getting to that time of year again with the nights drawing in the the weather getting cooler to start thinking about some festive crafting.

Along with the cards my first project is usual Advent Calendars, I make for Family & Friends and also to sell.

My Fill Your Own Advent Calendar is perfect for this as the treat Boxes are a good size and it can come out Year after Year so less waste too!

And these projects will be treasured and brought out yearly just like my Cracker Boxes.

Below is a Playlist of videos showing the different stages to make your own Fill Your Own Advent Calendar.

Here is the Online Workshop Link
https://dawnsinspirations.com/shop/dawns-fill-your-own-advent-calendar/
Here is the Pink Frog Craft Link
https://www.pinkfrogcraftsandcards.co.uk/12-x-12-card-268-c.asp


Filed Under: Free Tutorials, Off the Page Projects

Quick and Easy Craft Storage

Now is time to get your Craft Space organised!

You to can make some quick and easy craft storage with Pink Frog A3, A4 and 12×12 Card stock.


Filed Under: Free Tutorials, Off the Page Projects

Dawn’s “Fill Your Own Cracker Boxes”

I have been making these Cracker Boxes for years but not just for Christmas as I do them for Easter and even gift giving anytime of year.

My “Fill your own Cracker Boxes” are great at Christmas as you can get nicer gifts inside and other treats too! Just like my “Fill Your Own Advent Calendars” .

These can be used year after year if you store them and my original ones are 20 years old so thought it was time to update them as the children are older now.

Take an A4 sheet of card and on the long side score at 2 3/4″ – 5 1/2″- 8 1/4″ and 11″.
Then on the short side score one end at 2 3/4″ and then do a half turn and on the other end score at 1″- 1 1/2″ and 2″
To make a lid, cut a piece of card at just under 4 3/4″ x just under 4 3/4″ ( this means your lid will fit inside your cracker box top.)
If you watch the video I give you all the measurements for all the mats and layers, plus it is filmed in real time so you can have me with you in your craft room making your own Cracker Boxes.

Have fun and enjoy making yours!

Filed Under: Free Tutorials, Off the Page Projects

One Sheet Invitation idea

Using just one sheet of Pink Frog speciality A3 card I made this one sheet invitation. with the pocket you have plenty of room to add extra cards of information. this idea would work well for many occasions. I demonstrated this on Create and Craft TV during the Pink Frog Card and Crafts Show.

Here is my step by step video with all the measurements you will need.

Filed Under: Cards, Free Tutorials, Off the Page Projects

Double Triangle Gift Box

You to can make beautiful stunning gift boxes like this! with just a couple of sheets of A3 Card, I used the Pink Frog A3 card as this is great quality for construction projects.
I have put together a quick step by step video with all the measurements and know how you need to make up your own. so grab your supplies and have fun.

Filed Under: Free Tutorials, Off the Page Projects

Box in a Box – Gift Box

How to make this super quick and easy Box in a Box -Gift Box. Ideal for any occasion and makes even less expensive gifts look fabulous.
you make have seen me demonstrate this on Create & Craft TV and many of you have asked to see it again so see the video below for measurements and how to put this together.

The card and products used in this project are from Pink Frog Card & Crafts 

Filed Under: Free Tutorials, Off the Page Projects

Exploding Boxes

These Two sizes of Exploding Boxes fit so nicely nested together and can be used to hold photos or as a change from a standard birthday card.

You may have seen me demonstrate these on the Pink Frog Create & Craft TV Show. I have given you both imperal and metic measurments so you can create your own.

Imperal Version – Large Exploding Box 

  • Box Base – Take 12″ x 12″ Card and score at 4″ & 8″ and then do a quarter turn and score again at 4″ & 8″ and burnish your score lines.
  • Then draw a diagonal line on each corner square from the corner point to the centre square and cut the lines.
  • You fold 2  triangles over the squares on each side to create the pocket, only attaching tape or glue on the bottom line.
  • Decorate your Box Base.
  • Box Lid – Cut card at 8 1/8″ x 8 1/8″ and score in at 2″ on all 4 sides and burnish.
  • Decorate your Box Lid before gluding together.
  • Snip small wedges out of the corner squares so when gluing your box lid together the corners look neat.
  • Decorative Mats 
  • Photo Mats – 3 1/2″ x 3 1/2″
  • Outside side panels of Box Base – 3 1/2″ x 3 1/2″
  • Box Lid side mats – 1 3/4″ x 3 1/2″
  • Box Lid Top – Base Mat 3 3/4″ x 3 3/4″ and Top Mat 3 1/4″ x 3 1/4″

Imperal Version – Small Exploding Box 

  • Box Base – Take 9″ x 9″ Card and score at 3″ & 6″ and then do a quarter turn and score again at 3″ & 6″ and burnish your score lines.
  • Then draw a diagonal line on each corner square from the corner point to the centre square and cut the lines.
  • You fold 2  triangles over the squares on each side to create the pocket, only attaching tape or glue on the bottom line.
  • Decorate your Box Base.
  • Box Lid – Cut card at 5 6/8″ x 5 6/8″ and score in at 1 1/4″ on all 4 sides and burnish.
  • Decorate your Box Lid before gluding together.
  • Snip small wedges out of the corner squares so when gluing your box lid together the corners look neat.
  • Decorative Mats 
  • Photo Mats – 2 1/2″ x 2 1/2″
  • Outside side panels of Box Base – 2 3/4″ x 2 3/4″
  • Box Lid side mats – 1 ” x 2 3/4″
  • Box Lid Top – Base Mat 2 3/4″x 2 3/4″ and Top Mat 2 1/2″ x 2 1/2″

Metric Version – Large Exploding Box 

  • Box Base – Take 30cm x 30cm  Card and score at 10cm & 20cm  and then do a quarter turn and score again at 10cm & 20cm and burnish your score lines.
  • Then draw a diagonal line on each corner square from the corner point to the centre square and cut the lines.
  • You fold 2  triangles over the squares on each side to create the pocket, only attaching tape or glue on the bottom line.
  • Decorate your Box Base.
  • Box Lid – Cut card at 15.2cm x 15.2cm and score in at 2.5cm on all 4 sides and burnish.
  • Decorate your Box Lid before gluding together.
  • Snip small wedges out of the corner squares so when gluing your box lid together the corners look neat.
  • Decorative Mats 
  • Photo Mats – 8.5cm x 8.5cm
  • Outside side panels of Box Base – 9cm x 9cm
  • Box Lid side mats – 2cm x 9cm
  • Box Lid Top – Base Mat 9cm x 9cm  and Top Mat 8cm x 8cm

Metric Version – Small Exploding Box 

  • Box Base – Take 22.5cm 22.5cm Card and score at 7.5cm & 15cm and then do a quarter turn and score again at 7.5cm & 15cm and burnish your score lines.
  • Then draw a diagonal line on each corner square from the corner point to the centre square and cut the lines.
  • You fold 2  triangles over the squares on each side to create the pocket, only attaching tape or glue on the bottom line.
  • Decorate your Box Base.
  • Box Lid – Cut card at 13.7cm x 13.7cm and score in at 3cm on all 4 sides and burnish.
  • Decorate your Box Lid before gluding together.
  • Snip small wedges out of the corner squares so when gluing your box lid together the corners look neat.
  • Decorative Mats 
  • Photo Mats -6.5cm x 6.5cm
  • Outside side panels of Box Base – 6.5cm x 6.5cm
  • Box Lid side mats – 2.5cm x 7cm
  • Box Lid Top – Base Mat 7cm x 7cm and Top Mat 6.5cm x 6.5cm

Filed Under: Free Tutorials, Off the Page Projects

2020 Retreat Project -Dawn’s Inspirations

Just thought I would share with you the Project the crafters made at my 2020 Weekend Scrapbook Retreat.

Filed Under: Bespoke Designs, Free Tutorials, Off the Page Projects

  • 1
  • 2
  • 3
  • Next Page »
  • My Account

Newsletter


I give my consent to Dawns Inspirations to be in touch with me via email using the information I have provided in this form for the purpose of news, updates and marketing.


  • Shop
  • Account

Copyright © 2025 · Dawns Inspirations

Copyright © 2025 · Dawns Inspirations on Genesis Framework · WordPress · Log in