Dawn's Inspirations

Angelica & Adam Pop Up Box Cards

cards-01

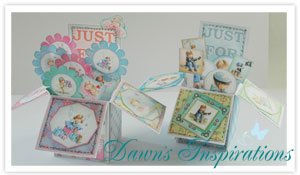
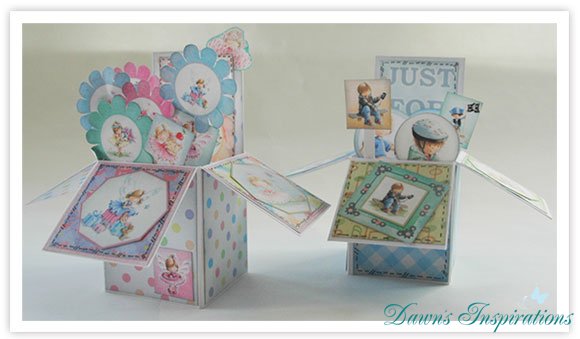
Here are a couple of pop up box cards I have made using Crafters Companion new Angelica & Adam range.

I made my pop up cards using the Crafters Companion Ultimate Pro and there is a video tutorial on how to make these cards.

Elements I have used to make these cards are the Angelica & Adam 6×6 paper pads, embossing folders and stamps and free downloads. All these products are available from the Crafters Companion website.
cards-02cards-03
cards-04

Filed Under: Tips and Techniques

Collall All Purpose Glue now in the US!

Collall All Purpose Glue is now avaliable in the US!

collall-buy-6-all-p20213-43772_zoom

You can purchase it online from

Crafters Companion.com

Filed Under: Tips and Techniques

Tips on Scoring with a Scoreboard

Many people ask why my paper does not crack when I score it and I am going to share my tips with you.

Paper has a memory to be flat and that is how it is made, now as papercrafters we want to change the memory so bend in different ways.
Often paper cracking is down to too much pressure, the wrong tool or digging the tool into the paper instead of letting it glide over the top when scoring.
In the video I show you how to score different types of papers as well as cardstock.
I do hope this quick tip will help many of you over come the problem of cracking paper.

Filed Under: Tips and Techniques

How to add Hinges to your Board Cover Mini Albums

Here is a quick tutorial to show you 2 different types of hinges you can add to your board mini album covers.
My version of Kathy Orta’s Hidden Hinge and laura Denison Stack the Deck system.

Filed Under: Free Tutorials, Tips and Techniques

Bouquet of Chocolate Tutorial

Bouquet of Chocolates

This is a quick tutorial that will help you turn a ordinary box of assorted chocolates into a beauitful bouquet a chocolates to give away as a  gift.


Filed Under: Tips and Techniques

3D Paper Stars

A Quick Tip to show you how to make 3D Paper Stars.

Cut out an equal 5 pointed star on to your chosen paperned paper, this can be of any size.

Cut out your paper star

Using a score board, score each point of the star from the tip to the bottom of the point.

Score your star

Now go ahead and burnish all your score lines.

Burnish your score lines

Fold the star in on itself so you have mountain and valley folds. Mountains for the large points and valley for the end points.

Fold the star in on itself.

Using an ink pad, ink all the score lines as this makes your finsihed star look more 3D

Use an ink pad to define score lines

Your 3D star is now ready to be used on your chosen projects.

Finished 3D Star

Filed Under: Tips and Techniques

How to make you own Washi Tape Tutorial

Washi Tape is a great product but it can be limiting as you have a whole roll of the same colour/design and you may only use a small amount on a scrapbook layout or project.

I will show you how to make your own washi tape in very little time and with a a few supplies. This way you can make the amount that you need and in a colour and design that suits your scrapbook layout or project.

Filed Under: Tips and Techniques

How to make your own Tab Embellishments


With the use of a circle punch and scraps of card stock or patterned paper use can make your own tab embellishments to match your scrapbook layouts and mini album projects.

In this Quick Tips Video, Dawn shows you how to make your own Tab Embellishments.

Filed Under: Tips and Techniques

Quicktips – Paper Clip Embellishments

Paper Clip Embellishments are a quick and cheap way of adding interest to your layouts or projects. Along with knowing they will match what you are doing if you use the scraps from your paper collection you are using.

I like to use the large paper clips as I find they stand out more on your scrapbooking projects.

They also come in a array of colours along with gold and silver tones so you can always match the project you are working on.


Filed Under: Tips and Techniques

Quicktips – Pen your Edges

Instead of always using a ink pad to take of that just cut look the edges of your paper. Why not dust of your Promarkers or similar pens and use these to edge your papers.

Using the chisel of your pen, run it along the cut edges of your papers to finish of your projects instead of inking.


I am not say you can do this on all your projects because sometime you need that ink edged /distressed look however, it will work well on alot of them and it is quick. You can also use any colour pen to match your work.

Another way of using your pens is with a ruler to give a thicker line, this is great way to edge your work so it looks like it has been “matting and layered” especially if you do it in Black or a darker colour.

So dust of you pens and give it a go!!! Check out the video to see how easy it is.

Filed Under: Tips and Techniques

  • « Previous Page
  • 1
  • …
  • 8
  • 9
  • 10
  • My Account

Newsletter


I give my consent to Dawns Inspirations to be in touch with me via email using the information I have provided in this form for the purpose of news, updates and marketing.


  • Shop
  • Account

Copyright © 2025 · Dawns Inspirations

Copyright © 2025 · Dawns Inspirations on Genesis Framework · WordPress · Log in